Viewing Wildlife at Grizzly Island Wildlife Refuge

IMG_3108

Hiking at a wildlife refuge? That’s what I thought at first too. I mean, aren’t those usually for hunting and fishing? Still, I decided to give it a try though after reading a trip report on another hiking blog. That and I wanted to do a hike that was easy but didn’t have to drive very far. This completely fit the bill. Despite it being close to my home in Vacaville, it’s still a bit of a drive outside of Suisun City, the closest town. You have to drive all the way to the end of Grizzly Island Road where it turns to gravel. Although there are many trails at the refuge,

IMG_3092

I started out at parking area #3 and hiked south across the footbridge. I definitely recommend parking area # because right next to it, there is a very large eucalyptus tree that can be seen from any point during your hike. That way, if you’re not sure where you are in relation to the parking area you can orient yourself.

IMG_3105

The first thing you’ll notice about trails at Grizzly Island is that they’re different from most trails you’ve probably hiked on before. First off, they’re wide and flat. Not too unusual and understandable given the flat topography of the marsh. Second, they appear to have once overgrown with grass and weeds, then mowed down with a ride on mower. As a result of this it can feel like you’re wading through grass in a sense, though it doesn’t come above your ankles. Still it’s not too bad given that everything out here is flat.

IMG_3103

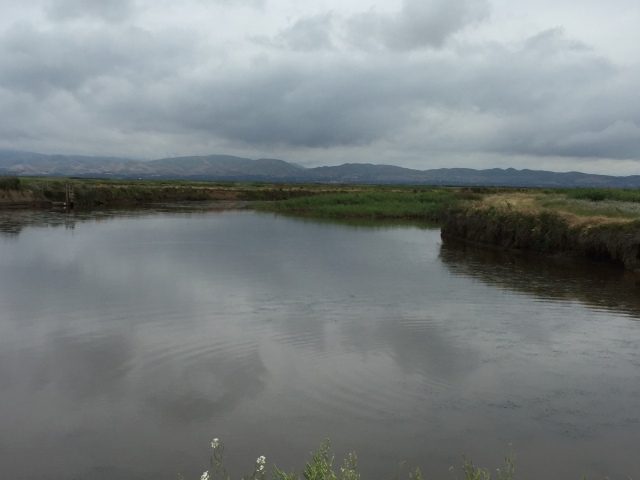
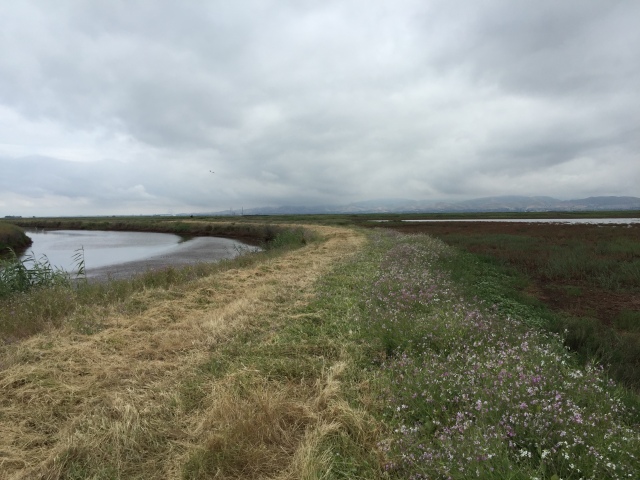
From the moment I started the hike, I noticed three things: how quiet it was out there, how much wildlife there was, and how really pretty the marsh can be at dusk! It was a really cool experience. I grew up in Suisun and have visited the marsh countless times, but on this hike I felt like I was seeing it in a whole new light. It had recently rained earlier in the day so the combination of everything looking fresh and green with the wide open, cloud filled sky made everything look so serene. The trails were lined with purple wildflowers and the waters shone in the waning light. Not too shabby for only being a wildlife refuge! As I hiked south along the trail from the parking area, I started to see lots of birds frolicking in the water, especially cranes and ducks. After a half mile I saw two tule elk dart across the trail and run across the marsh. It was magnificent to watch them run. Another half mile later I even heard a coyote in the distance! Thankfully I never saw it close enough to me…but it was cool to listen to.

IMG_3093

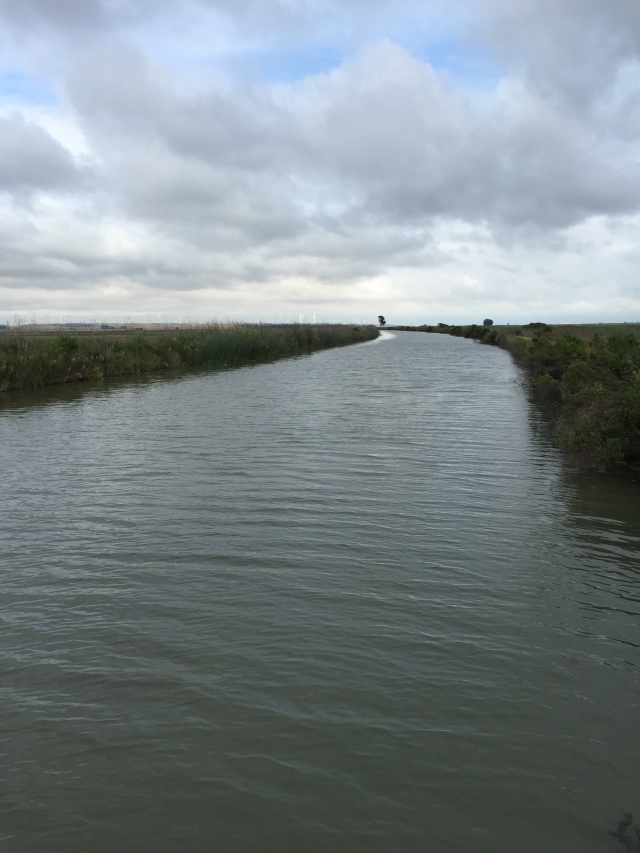
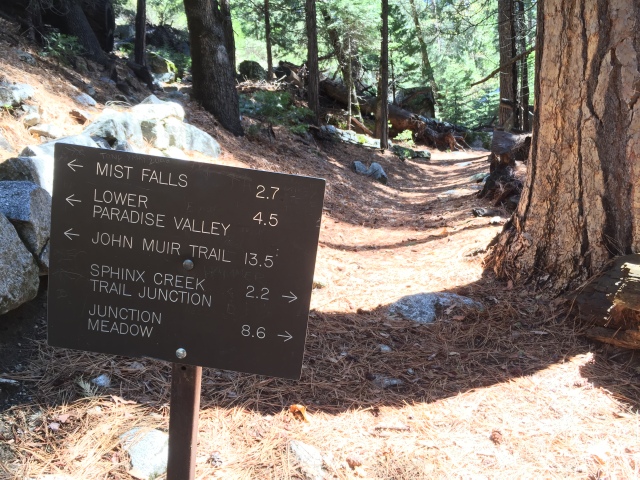
There are many trails at the refuge and it’s pretty easy to just pick what strikes your fancy. I wanted to make a loop, so at the second slough crossing I made a right and headed east along the south side of the slough. Here the number of birds thickened and many of them took flight as I approached. I hiked east along the slough and crossed over to the north side at the first opportunity. On the other side of the slough the path was more dirt than mowed grass, a welcome sight. After a short amount of backtracking I turned right and took the trail back to Grizzly Island Road. At this point I just hiked along the gravel road back to the parking area.

Trip Stats

Distance: 4 miles

Elevation gain: Negligible (trail is completely flat)

Time: 2 hours

Fees: $4.32 entrance fee (why the exact amount I have no idea). Payable at the self serve kiosk by the park office

Directions: From Highway 12 in Suisun, turn onto Grizzly Island Road near the Sunset shopping center. Drive south into the marsh for about 10 miles until you reach the park office. Pay the entrance fee and then drive for another 2-3 miles on Grizzly Island Road (now gravel) until you reach parking area #3 marked by the eucalyptus tree.

Trail map from the California Department of Fish and Wildlife found here.

Conquering Mission Peak

IMG_3054

Though it might be counter intuitive, Mission Peak evokes all sorts of different responses from Bay Area hikers. It is not the tallest peak, most prominent, and is nearly devoid of vegetation. Mission Peak is little more than a high mark in the hills above Fremont. Very little distinguishes this peak from the others that surround it, and can seem to blend in with the golden brown hills around it. Beyond that, hiking to the peak involves a 3 mile one way hike with 2,000 feet in elevation gain. To top it off, almost the entire route is exposed to the sun, making this a very hot hike in the summer. Yet this peak is one of the most popular hikes in the East Bay and is visited by hikers from all over the Bay Area. There are three reasons for this; it’s easily accessible from I-680, panoramic views of the entire Bay Area from the top, and a large pole on the peak that has become a favorite spot for Instagram photos. I’ll admit, I even partook in the tradition. Regardless, with a little planning and and sheer willpower, you too can enjoy all that Mission Peak has to offer.

IMG_3042

The first thing you have to understand about Mission Peak is that it has a serious parking problem. An average weekend day with nice weather can see over 2,000 people come to the park, while the parking area off Stanford Ave only has 40 spaces. You can see that this would cause a problem. For this reason, I (and the EBRPD) recommend parking at Ohlone College. This lengthens the hike by about a half mile each way, but it makes the climb to the top slightly more gradual. You can also get to Ohlone College by public transit, taking the AC Transit bus #217 from Fremont BART, which is what I did on this particular day. You’ll start by heading up the Peak Trail, and immediately your climb begins. Even before the first half mile I was huffing and puffing, and there isn’t much relief for the entire 3.5 miles to the top. You’ll pretty much be following the Peak Trail, passing through a few gates and junctions.

IMG_3044

After a mile you’ll pass a small pond and head up through a canyon. Here you’ll be on your longest stretch of trail with no junctions; just a long relentless climb. The only good part about this stretch of trail is that parts of it are shaded, which is a welcome relief after total exposure to the sun.

IMG_3048

Soon you’ll also start to get your first taste of the views to the north and to the east, as miles of rolling hills and mountains come into view. After 2.75 miles you’ll pass the only bathroom along the route. This also indicates that you’re at the final push and that the end is near. Pass the bathroom and turn left on the trail heading uphill. If you’re ever in doubt, just follow the crowds.

IMG_3049
200 feet almost straight up the hill! Holy smokes!

A couple of the hills on this stretch are particularly steep, so just power through, you’re almost there!

IMG_3050

The last push is a bit rocky but once you reach the summit, you’ll realize that all your hard work, sweat, and maybe tears has paid off.

IMG_3059
The East Bay, with Oakland, San Francisco, and Mt. Tamalpais in the distance.

Here you get 360 degree views of the entire Bay Area. I was able to see San Jose (and all of the Santa Clara Valley), the entire East Bay up to Oakland, San Francisco, the Santa Cruz Mountains, Mt. Diablo, Mt. Hamilton, Ohlone Wilderness, the outer East Bay suburbs, Mt. Tamalpais, Mt St. Helena, and Twin Sisters in the North Bay. Below you I-680 and 880 snake along and seem like a world away.

IMG_3068
Beyond looms Silicon Valley and the Santa Cruz Mountains

Bring a lunch and spend it soaking in the views. This might possibly be one of the best view sheds in the entire Bay Area. I also saw several people hang gliding above the peak and watched as they soared around like birds. It’s at this moment that you realize why so many people come up here despite the toil required.

IMG_3057
The Hidden Valley Trail snakes its way back to the Stanford Ave staging area.

When you’re ready to head down, the best way is to generally head back the way you came, following the Peak Trail back to Ohlone College. In this case, because I arrived by bus and was getting picked up, I headed back down the mountain via the Peak Trail, Grove Trail, and the Hidden Valley Trail to the Stanford Ave staging area where I met my ride. Even though I was heading downhill the entire time on this trail, I can see where this trail makes the hike to the summit a bit harder. It’s steeper than the trail from Ohlone College and far less shaded. Still, it’s the most popular trail to the summit because it’s much shorter. But anyway, I digress. At long last I reached the parking area and completed my hard earned rite of passage for Bay Area hikers.

IMG_3077

Word of caution: I strongly recommend doing this hike in the summer or when it’s going to be very warm. Whenever you do this hike make sure you bring plenty of water for yourself and companions (fellow hikers or dogs). Calls to 911 for help because of ill-prepared hikers are common on weekends, so don’t be one of those people! Bring lots of water and sunscreen and take it slow. Don’t overextend yourself. Also, Mission Peak has curfew hours in order to try and curtail the huge amounts of people that visit this park. Respect the curfew hours or you’ll get a ticket! They do patrol and hand out tickets after dark.

Trip Stats

Distance: 7 miles

Elevation gain: 2,000 feet

Time: 4-5 hours

Fees: Parking is free at Stanford Ave staging area, but at Ohlone College there is a $2 fee. No entrance fee for the park itself.

Mission Peak Regional Preserve is located in the hills above Fremont and is easily accessible from I-680. From 680, take the Mission Blvd exit and go north if coming from San Jose, south if coming from Pleasanton. Stanford Ave is located right off Mission Blvd, but to reach the recommend parking area at Ohlone College, follow Mission Blvd until you see the turn off for the college (it’s well signed). Park in lots D, E, G, or H. Alternatively, you can reach the trailhead by taking AC Transit bus #217 to Ohlone College.

Trail map from the East Bay Regional Park District can be found here.


Lakeview Trail at Eastman Lake Recreation Area near Madera

IMG_2998

A reservoir in the low Sierra foothills is probably not what one would initially think of when looking for great places to go hiking. Reservoirs in California are typically popular places for boating and fishing, but not hiking due to their often dry and hot locations. However, I was reeling off of a magnificent day spent at Kings Canyon and woke up the next morning thirsting for another hike (go figure, I must be crazy.) Being in Fresno at the time, the pickings can be slim at times for good hikes. I perused a hiking book on California written by Tom Stienstra (one of my favorite writers on the outdoors), and among the short list of good Central Valley hikes was Eastman Lake. Eastman Lake is located at the start of the Sierra foothills in Madera County, about 15 miles north of the city of Madera and about the same distance east of Chowchilla. It’s owned and run by the Army Corps of Engineers, and thus not a likely place to find a hiking trail. Still, I was intrigued by Stienstra’s review that was quick to note that in the spring when the hills are green and wildflowers are blooming, it can feel like “a slice of paradise in the Central Valley.” How could I pass up something like that?

I made the drive up from Fresno among tiny farm roads and eventually made it to the pay station. After paying my fee I drove up the road and turned right at the intersection near the dam, towards the admin office (only a Army Corps park could call a ranger station an administration office). After you pass the admin office the trailhead will be the fourth right turn you pass. Turn right at this turn and the road will dead end at the trailhead for the Lakeview Trail.

IMG_2989

When I arrived I was the only car in the parking lot and only saw one other couple the entire 8 miles I hiked. After 0.3 miles you’ll get your first lake view, and the views of the lake won’t leave for most of the hike. The trail mostly follows a ridge above the lake and gently goes up and down hills for 4 miles to Raymond Bridge, on the north end of the lake. Though you are constantly going up and down, they are short hills and it never feels very strenuous except for the distance.

IMG_3005

You’ll even get mile markers every quarter mile, in true Army Corps fashion (engineers love to measure stuff). I will note that the mile markers started to disappear after about two miles though, and I didn’t see them reappear until towards the end of the hike. Anyway, as you’re hiking along the trail be sure to soak in plenty of lake views. From the trail you can see pretty much the entire lake and the Buchanan Dam, which is quite impressive in size.

IMG_3019

After about 2.5 miles the lake takes on more of a stream quality with large boulders as the Chowchilla River enters the reservoir. It makes for a nice place to take a dip. Along the way I saw miles of green hills dotted with oaks, wildflowers, great views of the lake, and some wildlife.

IMG_3021

The last half mile leaves the stream for a bit and then suddenly, Raymond Bridge comes into view. Once you reach the bridge there is little more to do than to just turn around and head back. If you choose though, you could take a dip in the river here where in the earlier parts of summer it should be deep enough to swim (though I wouldn’t recommend hiking this trail in the summer due to the extreme Central Valley heat). Otherwise, return to the trailhead the way you came.

An interesting tidbit to note is that on this hike, I had problems with my boots. I had my backup hiking boots with me since I forgot to grab my regular boots before heading on our trip to Fresno. I’ve had these boots since high school and they were on their last leg. At Kings Canyon yesterday they were really starting to come apart, but Eastman Lake was what really did them in.

IMG_3001

This was what happened after hiking just one mile at Eastman. Not to be deterred, I got creative and was able to wrap the shoe lace around the bottom of the boot and tie it off really tight at the top. Using this method I was able to hike the remaining 7 miles. It was tied sufficiently that the sole of the boot didn’t flap around as before and felt great! If you’re ever crazy like me and end up in a similar situation, this was an easy fix that worked really well. Afterwards though it was time to retire my old boots. They were good to me and saw many miles!

IMG_3031

Trip Stats

Distance: 8.39 miles out and back

Elevation gain: 588 feet total gain, spaced out over the entire hike

Time: 3-4 hours

Fees: $5 parking fee, payable at a self pay kiosk at the park entrance

Directions: From Madera, take the Cleveland Avenue exit off of Highway 99. Head north on Country Club Drive out of town then turn right onto Avenue 26. Left onto Road 29, then follow the road into the park. Signs are plentiful to help direct you. From Chowchilla, follow Avenue 26 from Highway 99 east out of town then the directions are the same.

Pick up a trail map from the kiosk outside the admin office on your way to the trail head. I couldn’t find a good one online.

Redwood Canyon at Kings Canyon National Park

IMG_2970

One of the things I love most about Kings Canyon National Park is the diversity that lies within its borders. Most people come to Kings Canyon to see the canyon itself and the General Grant tree, the second largest Giant Sequoia known to mankind (only the General Sherman tree in neighboring Sequoia National Park is bigger). Sequoias are the largest trees that grow anywhere on earth, and standing next to one is guaranteed to make you feel quite small. The General Grant tree, for example, stands at a height of 268 feet and has a trunk with a circumference of 107 feet. In other words, freaking big! You really don’t get a sense of these trees until you stand right next to them. There are two great places to see groves of Sequoias within the KCNP boundaries. The first is the General Grant grove, as mentioned before, and the other is at a place called Redwood Canyon, located 2 miles down a dirt road off of the Generals Highway. It’s a bit bumpy to get down there but worth it to leave the crowds behind for a bit. Park at the obvious dirt lot trailhead and begin your hike here. I took the loop heading towards the Hart Tree and hiked downhill for about a mile and came back, due to time constraints. However, there are two main loop hikes and either look promising. What I saw in those two miles of hiking made it all worth it though.

IMG_2953

I started out by taking the left loop out of the parking lot, then made a right at the first junction I saw and started heading downhill towards the creek. As you hike through this peaceful forests, you’ll notice stands of giant sequoias standing among pines and firs. It’s amazing and awe inspiring to stand next to these trees and look up to their top most heights.

IMG_2969

Along the way I also saw a couple of fallen sequoias, which really allows you to see the true mass of their size. Nothing will make you feel smaller than standing next to a Sequoia. You can hike this trail all the way down to the creek and come back (all uphill), or make a loop hike out of it.

IMG_2955

The groves of sequoias here is not quite as concentrated as at the General Grant grove but they are still seen at every turn. Plus, you won’t have to fight the crowds which is a plus. I would highly recommend Redwood Canyon for this reason!

Trip Stats

Distance: 2 miles (can be much longer if you choose to)

Elevation gain: About 300-400 feet, all on the way back

Time: About an hour

Fees: Entrance to Kings Canyon and Sequoia National Parks is $30 per car, valid at both parks for 7 days. Unless you do what I did and find one of their free entrance days and go that day.

Directions: From Fresno, take Highway 180 for about 50 miles until you reach the pay station entering the national park. At the highway junction after that go towards Sequoia Park onto the Generals Highway. Follow this highway for about 3.5 miles and look for the turnout for Redwood Canyon. Turn right onto the dirt road and follow it down into the canyon for about two miles. You’ll see an obvious dirt lot where you can park and start the hike.

Trail map and trail descriptions from the National Parks Service found here.

Mist Falls Trail at Kings Canyon National Park

IMG_2815

Disclaimer: Life has been very busy lately so I am writing this over a month after I actually did this hike. Some of the details may be a bit fuzzier than usual, but I’ll try and make it as detailed as possible.

Spring is a glorious season! Warmer weather returns, the hills turn a nice shade of green, and wildflowers are in full bloom. At higher elevations, snow starts to melt and plants awake from their winter slumber. Spring also brings another exciting event (at least for me); Caltrans reopens the highway into Kings Canyon around late April depending on the weather. If I haven’t mentioned it before, I’ll mention it now. Kings Canyon is by far one of my favorite places in the entire world. I’ve been to a lot of national parks and stood in awe at many vistas across the west, but none of these compare to the awe I feel when I stand at the edge of the most magnificent canyon in the west (only the Grand Canyon might edge out Kings as more spectacular, but I digress). Kings Canyon gives me everything I love about the Sierra Nevada; towering granite walls, thick pine forests, roaring rivers, and waterfalls aplenty. So, this spring when the opening of Highway 180 coincided with National Parks Week (free admission!), I knew that it was time to make a pilgrimage back to the wonderful cathedral that is Kings Canyon.

In Kings Canyon, there is no better hike that I can recommend than Mist Falls. This 9-10 mile out and back trail gains a moderate amount of elevation over most of the hike, so it never feels like you’re climbing too much. Plus, at the end you get to see a spectacular waterfall. Sound great? It’s better than great. It’s sublimely wonderful.

The hike begins where the road ends, at aptly named Road’s End. You can’t miss it…all you have to do is follow Highway 180 to the end of the road. Find the signs for the trail to Mist Falls. You have two options, follow the trail on the north side of the river, or the one on the south side of the river. Both will eventually get you to the same place. The one on the north side is slightly shorter and so thus I opted for this one. It stays mostly flat as it winds its way through a forest of ponderosa and lodgepole pines. Though I could hear the river most of the way, the trail was far enough away that most of the time the river wasn’t in sight. Most of the time will be spent craning your neck looking at the high granite walls of the canyon. The views looking up along this stretch are spectacular, but only a taste of what’s to come.

IMG_2828

After about two miles you’ll see a sign directing you to a trail off to the left towards Mist Falls. Here you’ll start to begin a gradual ascent that will last for most of the rest of the hike, though it never feels like too much. This trail also follows the Kings River much more closely and provides a nice backdrop for the hike.

IMG_2841

When I did this hike in late April, the river was a torrent filled with snow melt. As you hike, you might be torn as to which direction to look; up at the magnificent canyon walls, down at the roaring river, or around at the peaceful forest that surrounds you. Don’t forget to look behind you on occasion as you climb higher into the canyon. The views here are some of the best of the hike, in a hike that is constantly full of incredible scenery.

IMG_2846

This particular overlook was my favorite of the hike. The trail climbed up a switchback onto a granite slab and as I rounded the corner I let out a gasp and an, “Oh WOW!” It is so surreal that it looks fake, almost like a movie set. Then you remember that this is reality, and you thank God you live in California. But don’t worry, it gets even better! Continue to follow the trail up the canyon, even as it becomes a little spotty over granite slabs. Eventually though, you’ll see a sign for the falls and suddenly, they come into view.

IMG_2867

Mist Falls kind of assaults you with its beauty, and all of the sudden you’re standing in front of a magnificent torrent and feeling the spray from its power. All you can do is stare. I recommend climbing up another quarter mile and finding a nice picnic spot for lunch. Just be careful on the granite; it can be slippery. Enjoy your time here and savor it, as I did. It has a way of melting away any worries and troubles. This, my friends, is why we come to places like Kings Canyon. It works its way into our hearts and makes a home there, beckoning us back whenever we can. And it never gets old.

IMG_2861
My lunch spot!

For the rest of the hike, you’ll just retrace your steps back down the trail following the Kings River. When you reach the junction you can either turn right and follow the same trail you came in on, or turn left and cross the footbridge, then go straight for a quarter mile before turning right.


IMG_2930

This trail is far less used because it’s a slightly longer way back to the parking area at Road’s End, but no less spectacular. Take this if you want a bit more solitude, especially after the hordes of day hikers take to the main trail in the afternoon. Return to your car and continue on to visit other great sights in Kings Canyon. I can highly recommend Zumwalt Meadow; it’s not to be missed. Also, on your way out, stop by Grizzly Falls after reentering the national forest. It’s right off the highway and a nice place to pull over and rest for a few minutes while viewing a spectacular waterfall.

Trip Stats

Distance: 10.78 miles (probably slightly less if you take the main trail both ways)

Elevation gain: 800 feet, spread out over the entire hike. It never felt strenuous.

Time: 4-5 hours (or more if you want to really savor the views as I recommend)

Fees: Entrance to Kings Canyon and Sequoia National Parks is $30 per car, valid at both parks for 7 days. Unless you do what I did and find one of their free entrance days and go that day.

Directions: From Fresno, take Highway 180 for about 50 miles until you reach the pay station entering the national park. At the highway junction after that go towards Grant Grove and Cedar Grove. The highway will pass the Grant Grove village and the turn off for Hume Lake before descending down into Kings Canyon. Road’s End is about 35 miles past the Grant Grove Village and takes about an hour to drive. Savor the drive; it’s one of the most spectacular drives you will likely ever do.

Trail map from the National Parks Service found here. It’s not the most detailed but there are few junctions and trails are well signed. If you plan to do backcountry hiking I highly recommend Tom Harrison Maps.

IMG_2762
View from Highway 180 at the top of Kings Canyon, looking down at the Kings River and Monarch Divide Wilderness.

Falls Trail at Mt. Diablo State Park

IMG_2696

Ah life, why must you be so busy? As may have clear, I’ve been getting a bit behind on posts. This hike is one I did several weeks ago, but I’ll do my best to remember all that I can. That likely won’t be hard, as this was a pretty memorable hike.

For anyone that lives in the Bay Area, Mt. Diablo is a pretty well known landmark. It rises out of the East Bay landscape to 3,849 feet, far above anything else around it. It can be seen for miles around, and those that see the views from the top are in for a treat. On a clear day, it has one of the best viewsheds in the entire western United States.

IMG_2703
View from the summit of Mt. Diablo, looking north towards the Carquinez Strait

One can see the entire Bay Area, Sierras, Mt. Lassen, and occasionally Mt. Shasta on an exceptionally clear day. But Mt. Diablo also has a darker side. Hikers in this area know Mt. Diablo to be notorious. In the summer, it’s devilishly hot, and most hikes on the mountain are very steep. Attempting to summit the mountain on foot will be met with a relentless uphill climb that seems to never end. I’ve summited once previously when I was in high school, and I still consider it to be one of the hardest hikes I’ve ever done. This day, however, my goal was not to summit. With it being spring, I was headed off for the north side of Diablo, for a place called the Falls Trail.

The Falls Trail on the north side of Diablo will make you change everything you thought you knew about Mt. Diablo. If you time it right by heading there in the winter or spring after a good winter storm, you will be rewarded with several waterfalls and a lush landscape of ferns and oaks. During my hike I counted four waterfalls. By the time I did the hike they had diminished slightly but I can tell that when at full force they are a sight to see. I started my hike at the unofficial parking area located at the end of Regency Drive in Clayton. Starting the hike here will make it shorter than parking at Mitchell Canyon, and parking here is free. The hike starts out on the Donner Creek Fire Road, gaining small amounts of elevation as you go. When you reach the Cardinet Oaks Road, turn left. Here’s when the real climb begins. Here you climb up on top of a ridge over the course of a half mile, and it’s quite steep. The payoff is that you start to get great views to the north of Clayton, Concord, the Carquinez Strait, and the Delta beyond.IMG_2668 
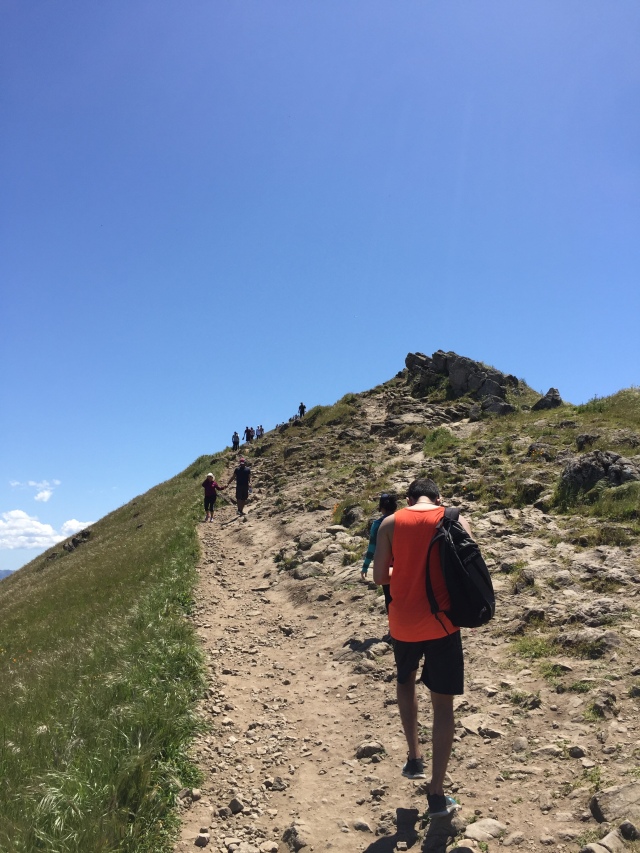
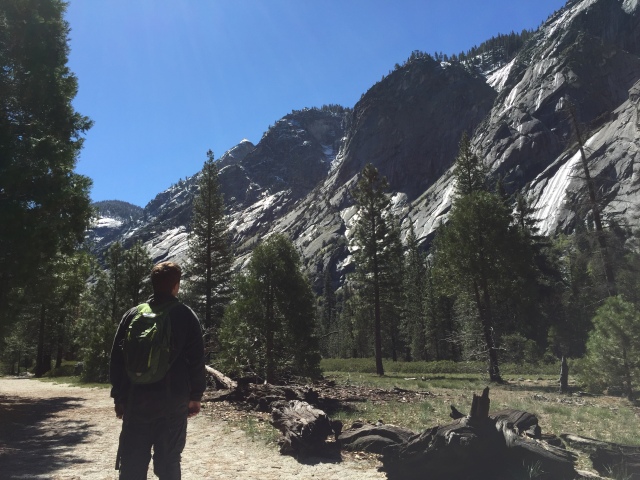
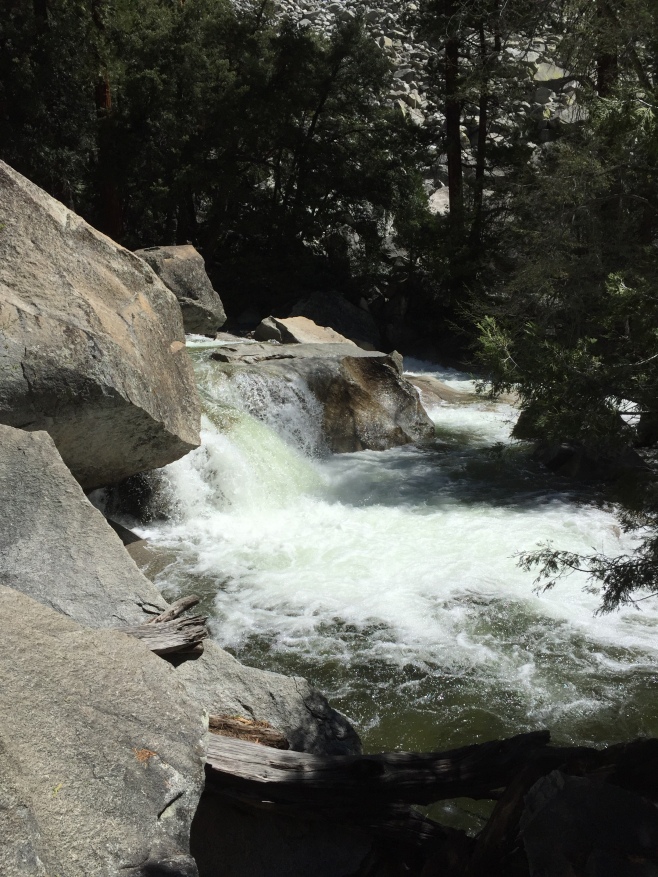
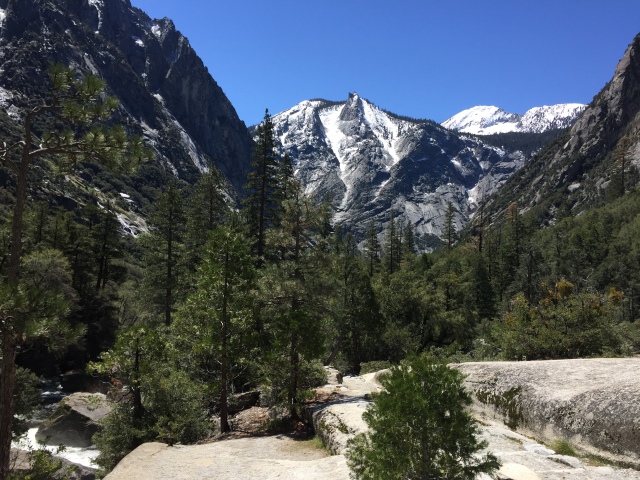
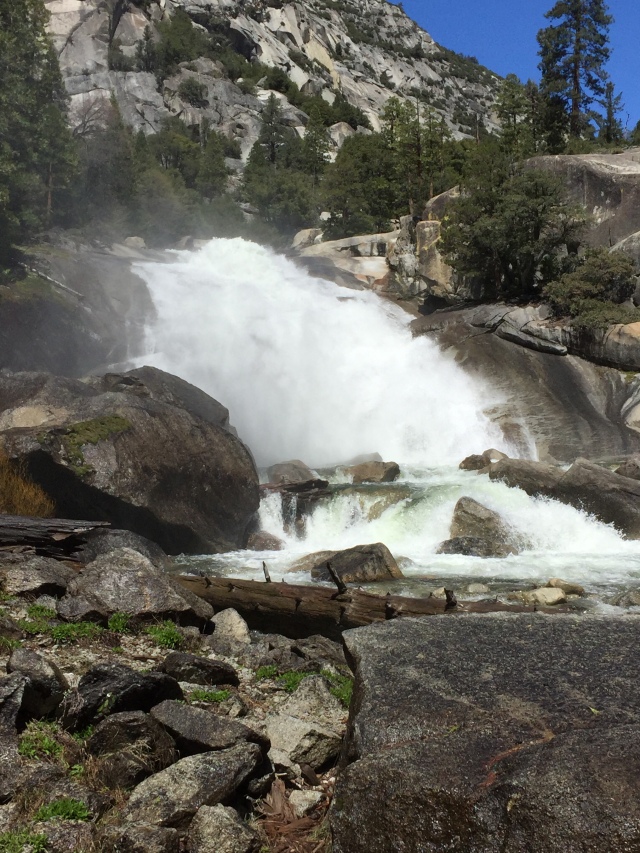
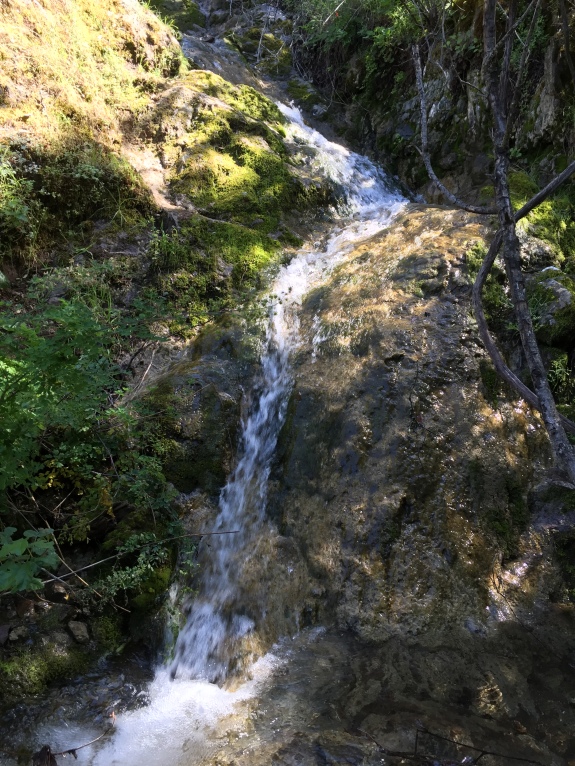
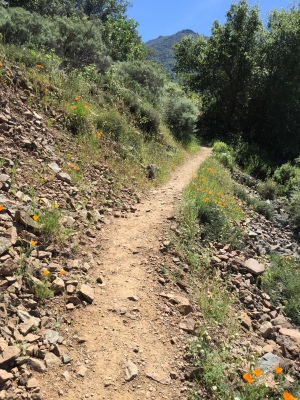
Once you reach the Falls Trail, it starts to level out again and follow the ridge. Careful here though, the trail is narrow and there’s a fairly steep drop off. Shortly after, maybe another half mile, you’ll start to see the falls. Some of them spill over the trail while a couple others you’ll see from a distance. Just keep following the trail, and you’ll keep seeing waterfalls. They make great stops for lunch, as I did at one of the smaller falls. Even when you’re not looking at waterfalls, you have a rushing creek and ferns to look at. It’s all very surreal to think that you’re still on Mt. Diablo! Take it all in and take it slow, it’s a sight to behold. If you continue to follow the Falls Trail, you’ll eventually reach Meridian Ridge Road. Turn right here and it will take you back to the Donner Creek fire road that will take you back to the parking area.

If you’re able to make it to Diablo in the spring, I would highly recommend doing this hike.IMG_2677 
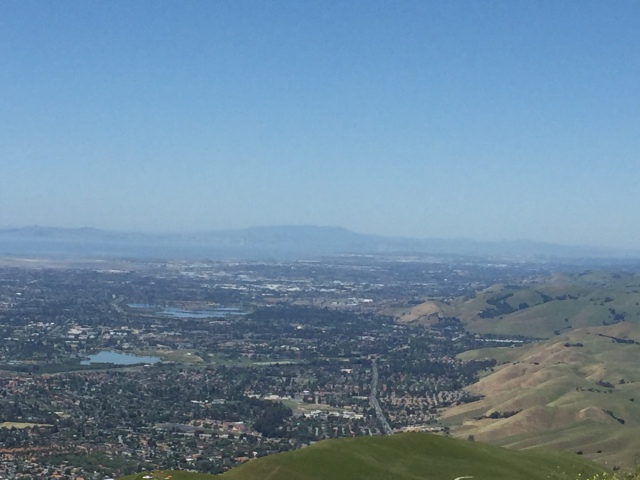
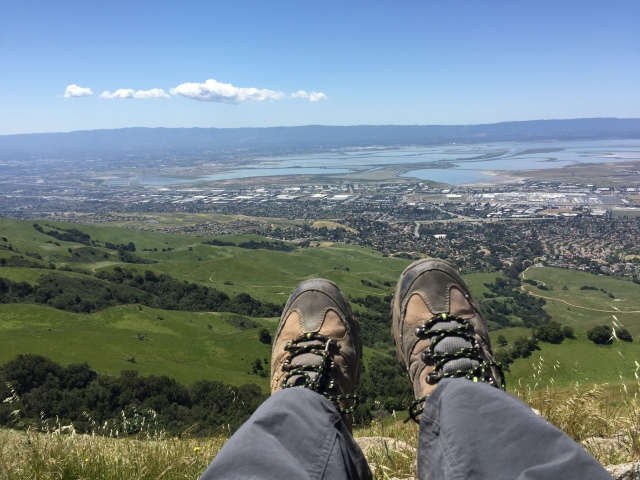
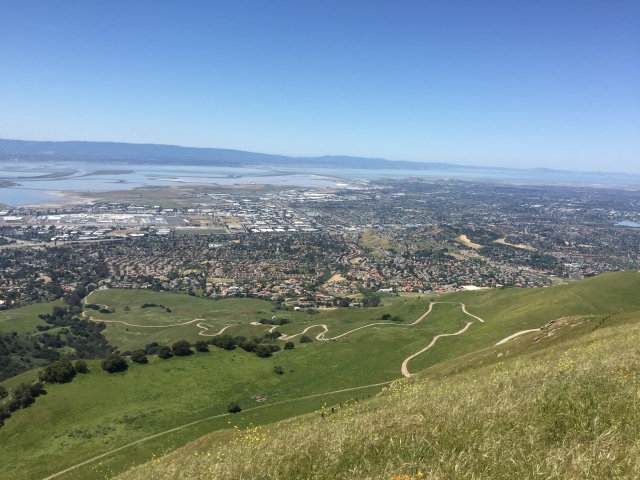
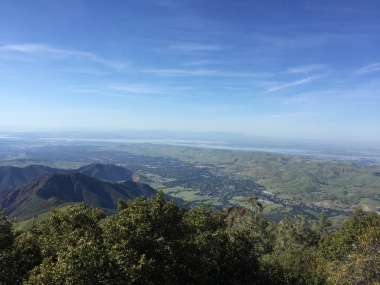
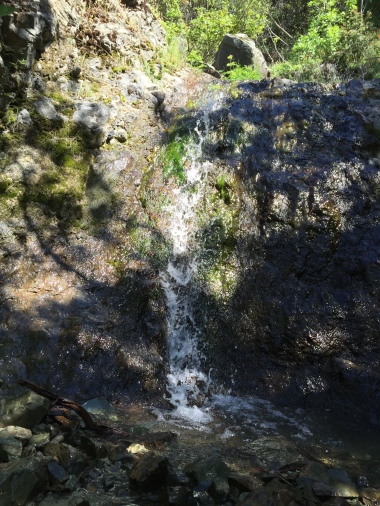
It’s got a bit of elevation gain (about 1,000 feet), but the views and sights that you see make it well worth it. This hike must be timed correctly though. By late spring/early summer the falls are dry and won’t start up again until the following winter. It would still be a nice hike other times of year, just without the waterfalls. Plus another tip, if you’re willing to pay the $10 and make the drive, I would recommend driving to the summit of Diablo. The views are absolutely incredible!


Trip Stats

Distance: 5.94 miles

Elevation gain: 1200 feet

Time: 2.5-3 hours

Fees: Parking at the trailhead at Regency Drive in Clayton is free. However, should you choose to drive to the summit the entrance fee is $10

Mt. Diablo is located in the East Bay and is easily accessible from I-680. To reach the Regency Drive trailhead, take the Willow Pass Road exit off of 680. Turn left if coming from the north, right if coming from the south. Follow Willow Pass to Galindo Street, turn right. Turn left onto Clayton Road. Follow Clayton Road all the way to Clayton, then turn right on Regency Drive. The road dead ends at the trailhead.